I’ve been doing some maintenance work on this blog and came across some interesting shortcomings of WordPress. When I first began this blog I used Flickr to host all the images that went into blog posts. I recently decided it would be best to break this dependence on Flickr and went through the painstaking process of importing all images and updating each and every post.
During this lengthy process I discovered that there was avery notable difference between the images resized by Flickr and the images resized by WordPress. Bellow is a prime example of the quality difference. Both images came from the same original source file which is a jpg image with a width of 1024 pixels and a height of 769 pixels. On the left you have the Flickr version and on the right you have the WordPress version.
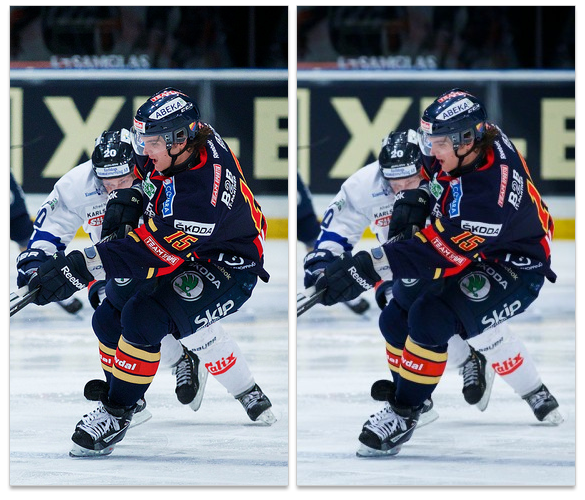
Like I said, the difference is notable. The resized image generated by WordPress is much softer than the version created by Flickr.
So, what exactly causes this?
Wondering why there was such a visible difference between the two I turned to Google and did some research. After reading some articles I learned that WordPress processes images with a library called GD. From what I gather GD really only excels in making small thumbnails, otherwise it seems to have a lot of flaws. For example GD will strip out all EXIF information from the images it creates. In doing so GD will also remove any monitor or color profiles that were attached to the image. This can result in the colors not being completely accurate. GD also struggles in resizing, as proven by my example. It creates very poor quality files that are extremely soft and not very sharp. To top it off WordPress does not allow you change any of the default GD settings.
How this can be fixed
Luckily there is a fix. It involves using a different image process library called ImageMagick. Unfortunately not every server has ImageMagick installed, so you will need to check with your host and see if ImageMagick is available.
If you have ImageMagick installed there is a wonderful plugin for WordPress that will replace GD and use ImageMagick to process all images. Once you download and install the plugin it’s fairly simple to setup. You select ImageMagick Engine from the Settings menu and are taken to screen where you can configure the plug-in.
The first thing you need to do is check in the check box labeled Enable enhanced image engine. This will active the ImageMagick engine. Beneath it there are some options for Image Engine and ImageMagick Path, in my case both of these were setup accurately from the get go. However you might have to change these depending on how your server is configured.
After that come some settings regarding how the images are processed. Optimize for size is set to 70 by default while Optimize for quality was left empty. You can change these with any value from 1 to 100, one being the lowest and one hundred being the best. I ended up settling on 100 for Optimize for quality and leaving Optimize for size at it’s default value. This has, in my initial tests, given me resized images that are more or less on par with the quality of the images generated by Flickr.
Finally the plug-in has a panel to the right that gives you the option to reprocess all images on your site with the ImageMagick Engine. I recommend being cautious and giving some serious thought to doing this. Depending on the amount of images and the size of images the process will be lengthy and could be very taxing on your server. It could temporarily bring down your entire website if the server is not configured with sufficient memory to complete the task.
A safer way to do this is to go through your posts individually one by one. I know it seems like a lot more work, but it can be accomplished fairly quickly. Inside a post click on the Add Media button. You should arrive on the Media Library and have a drop box that allows to select Uploaded to this post. Once you’ve done that you should only have the images from said post in front of you. You can then select images and then choose Resize using ImageMagick on the right.
That about wraps it up
Hope this helps anyone disappointed with the image quality of WordPress generated images. If you have any questions feel free to ask on Twitter and I’ll try to do my best to help you get everything sorted out.